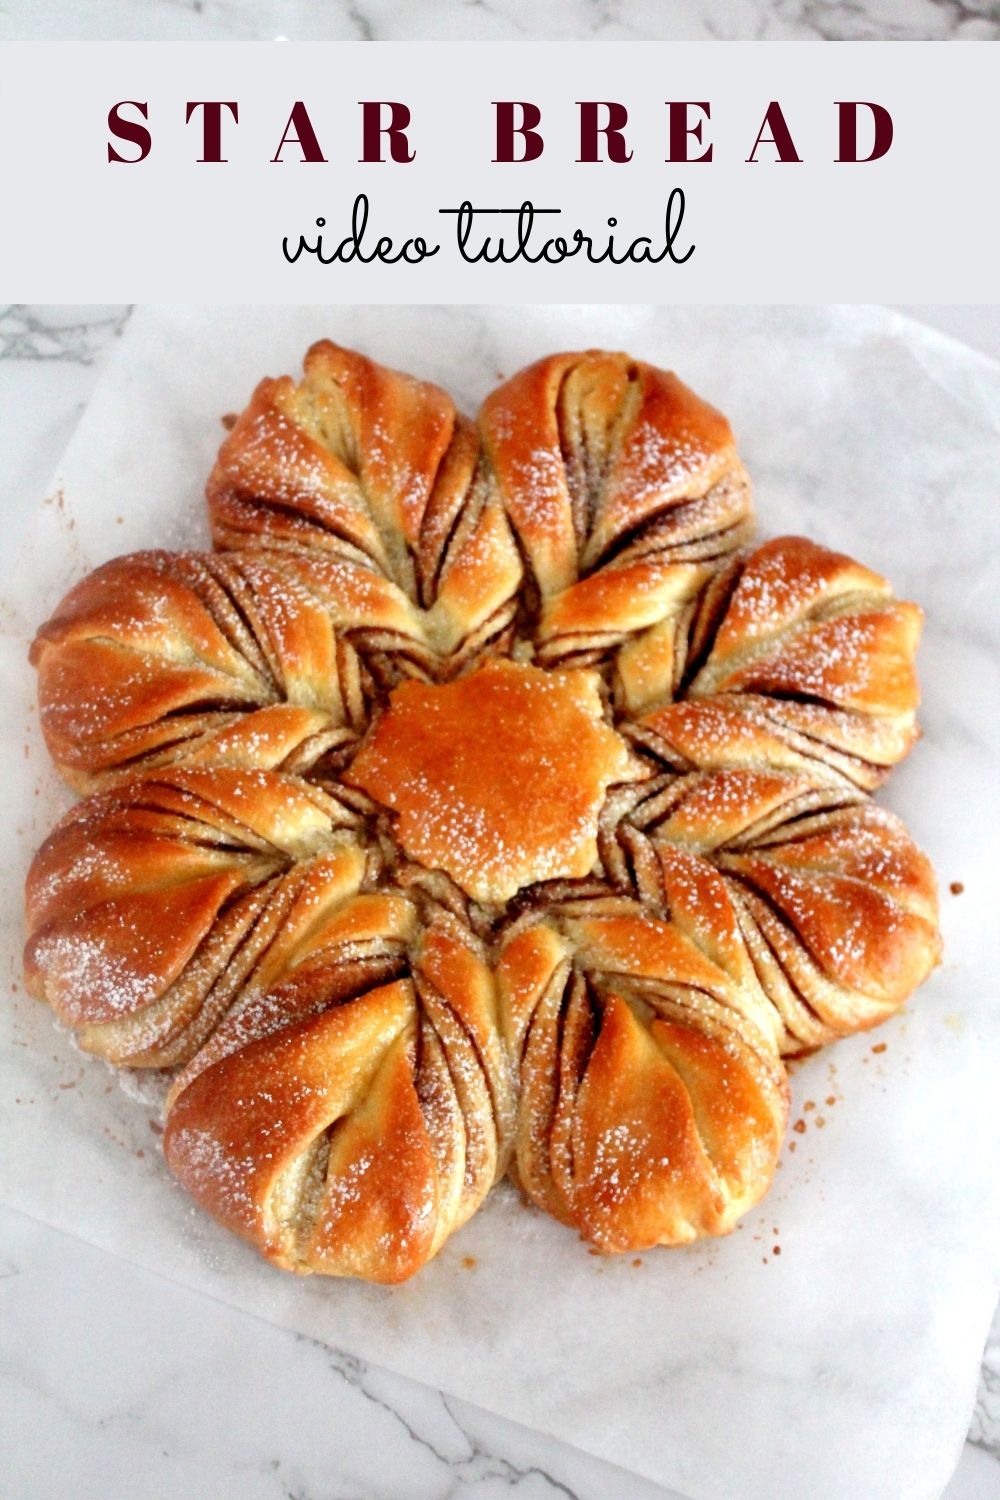
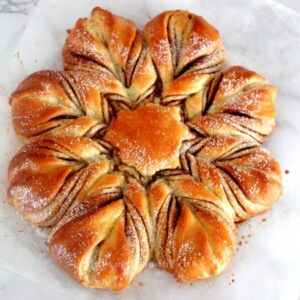
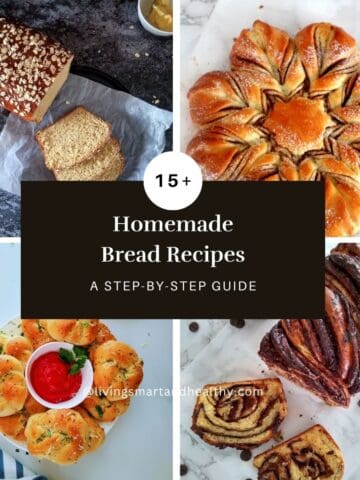
Here is my tested, no-fail Star Bread recipe, complete with a step-by-step video tutorial. It's a stunning holiday brunch centerpiece that looks impressive but is incredibly simple to create.
You can use classic cinnamon sugar, Nutella, jam, or savory fillings to make it your own. In this blog post, I have shared 16 different fillings variations, from sweet to savory pull-apart star bread.

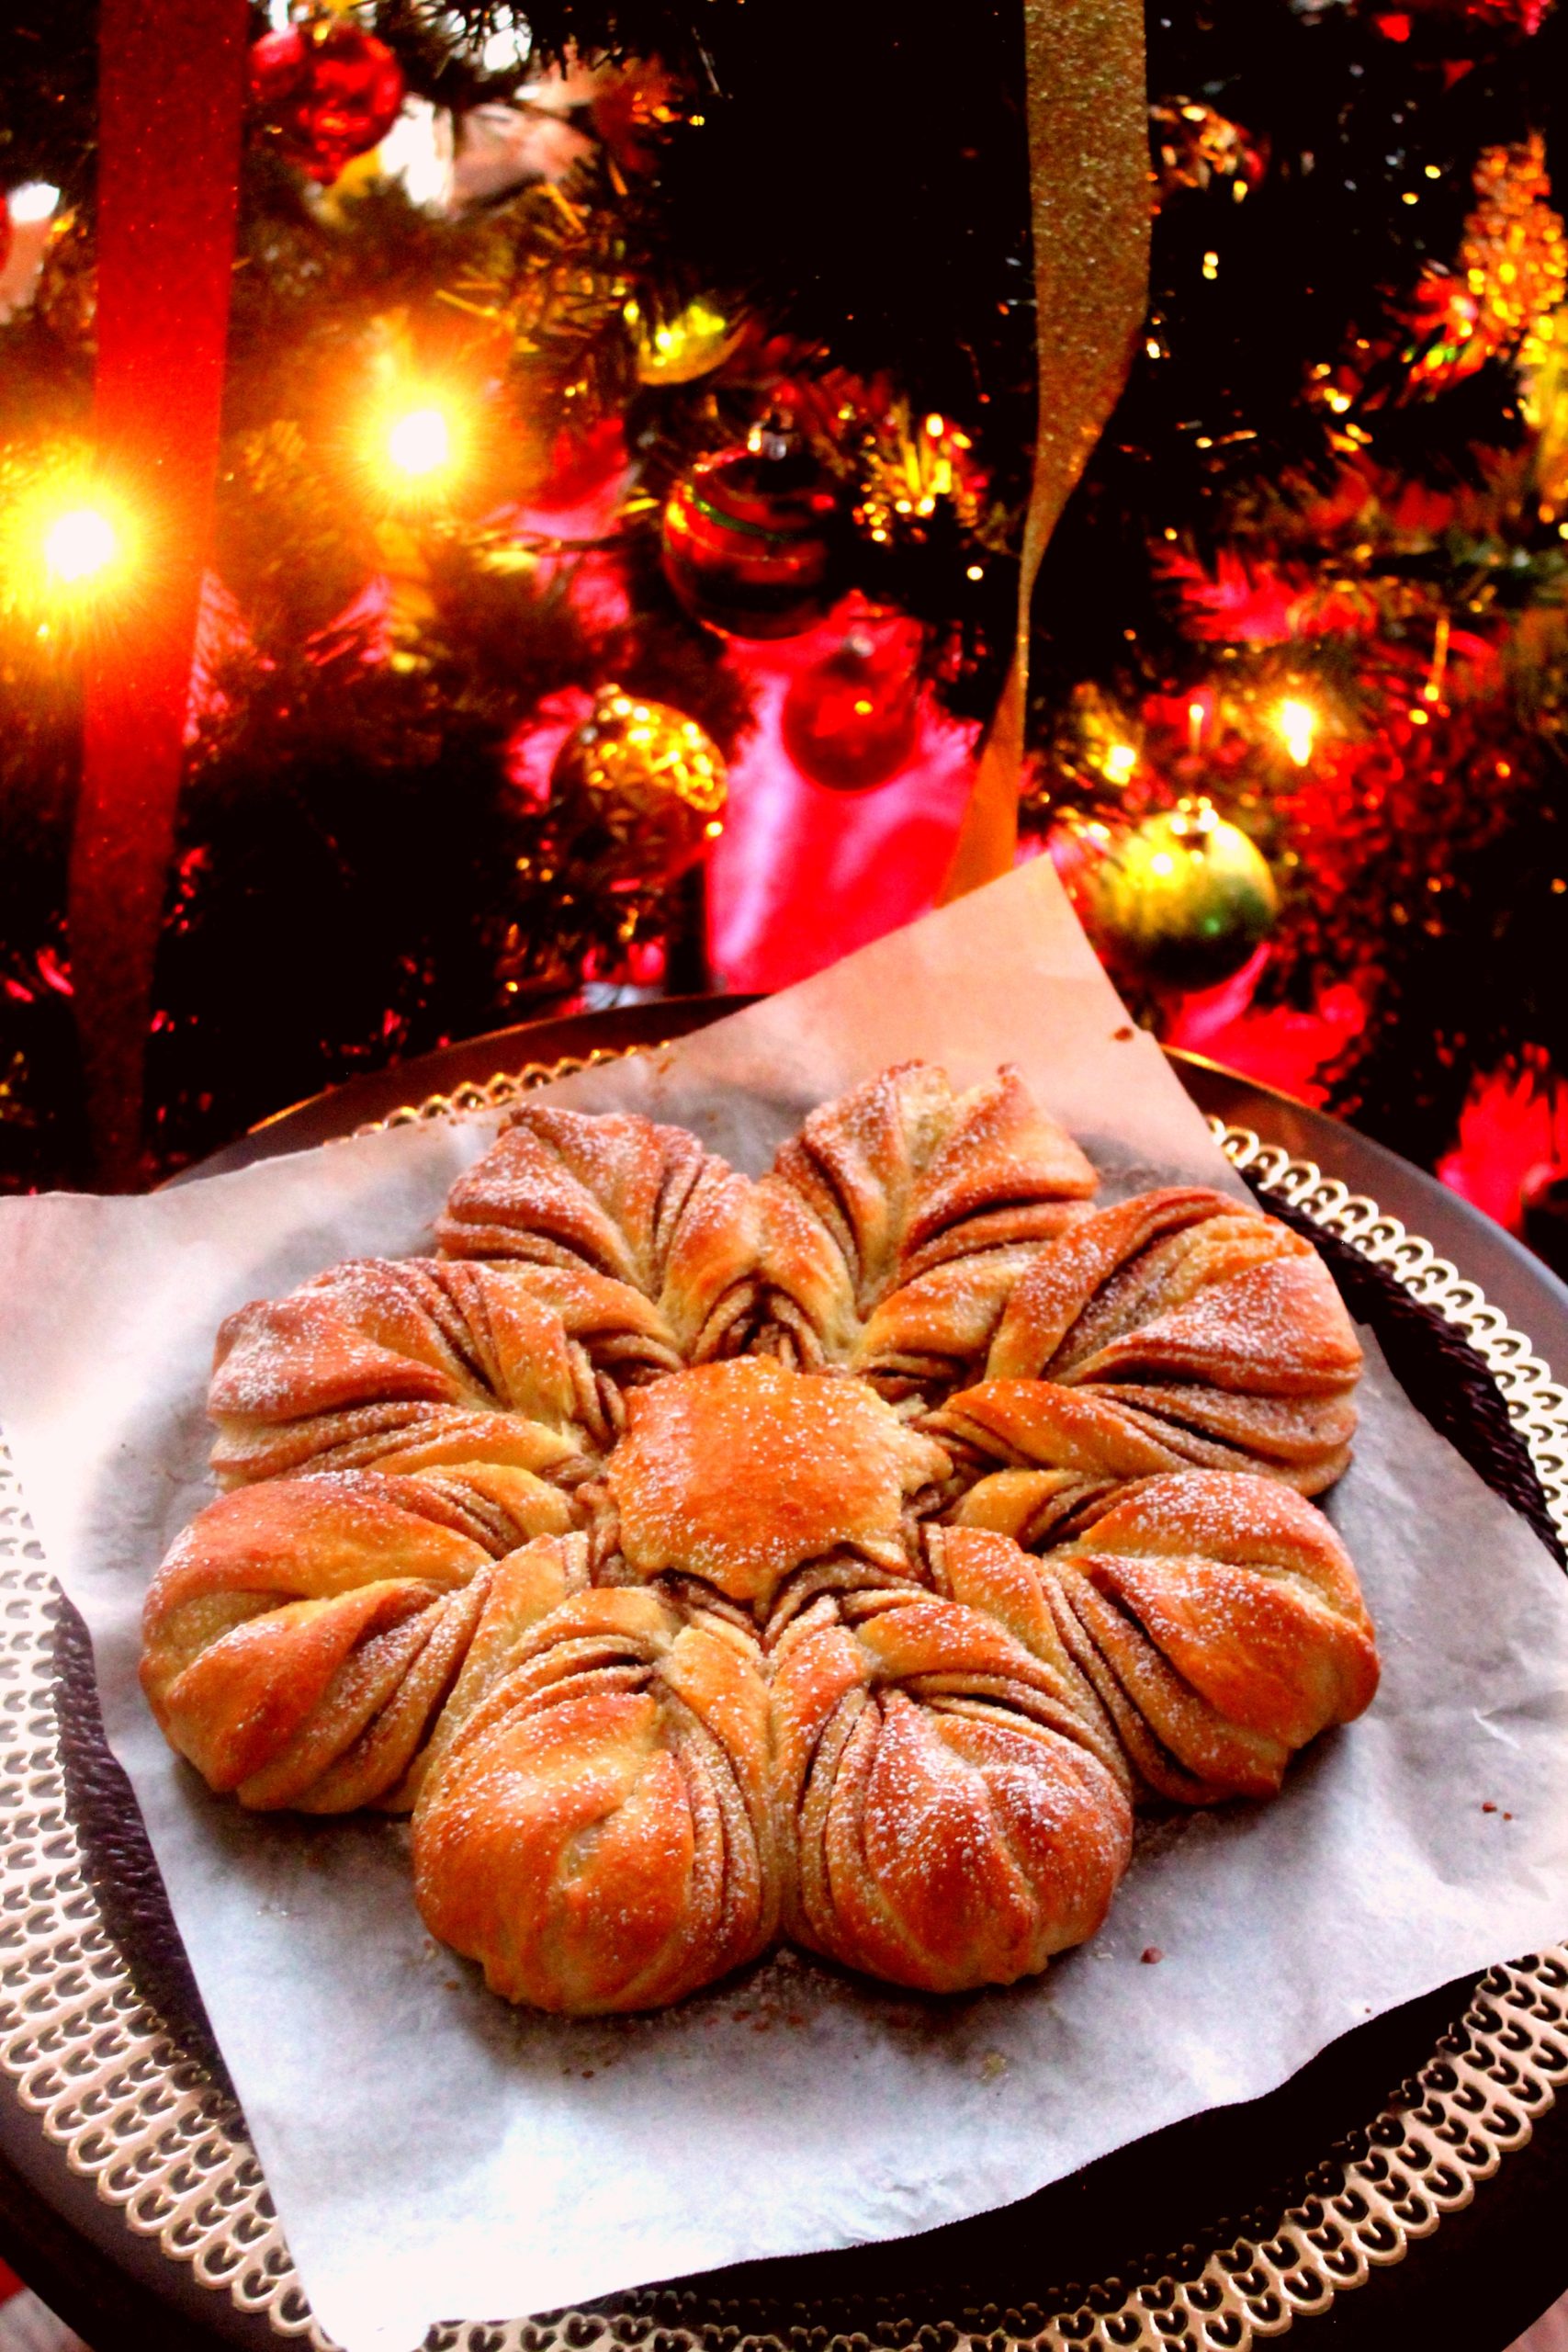
Star bread is one of the recipes, I bake every year. It has now become our family tradition of making star bread on Christmas morning. A piece of star bread, with a cup of coffee and time spent with my loved ones, is what sums up my holidays!!
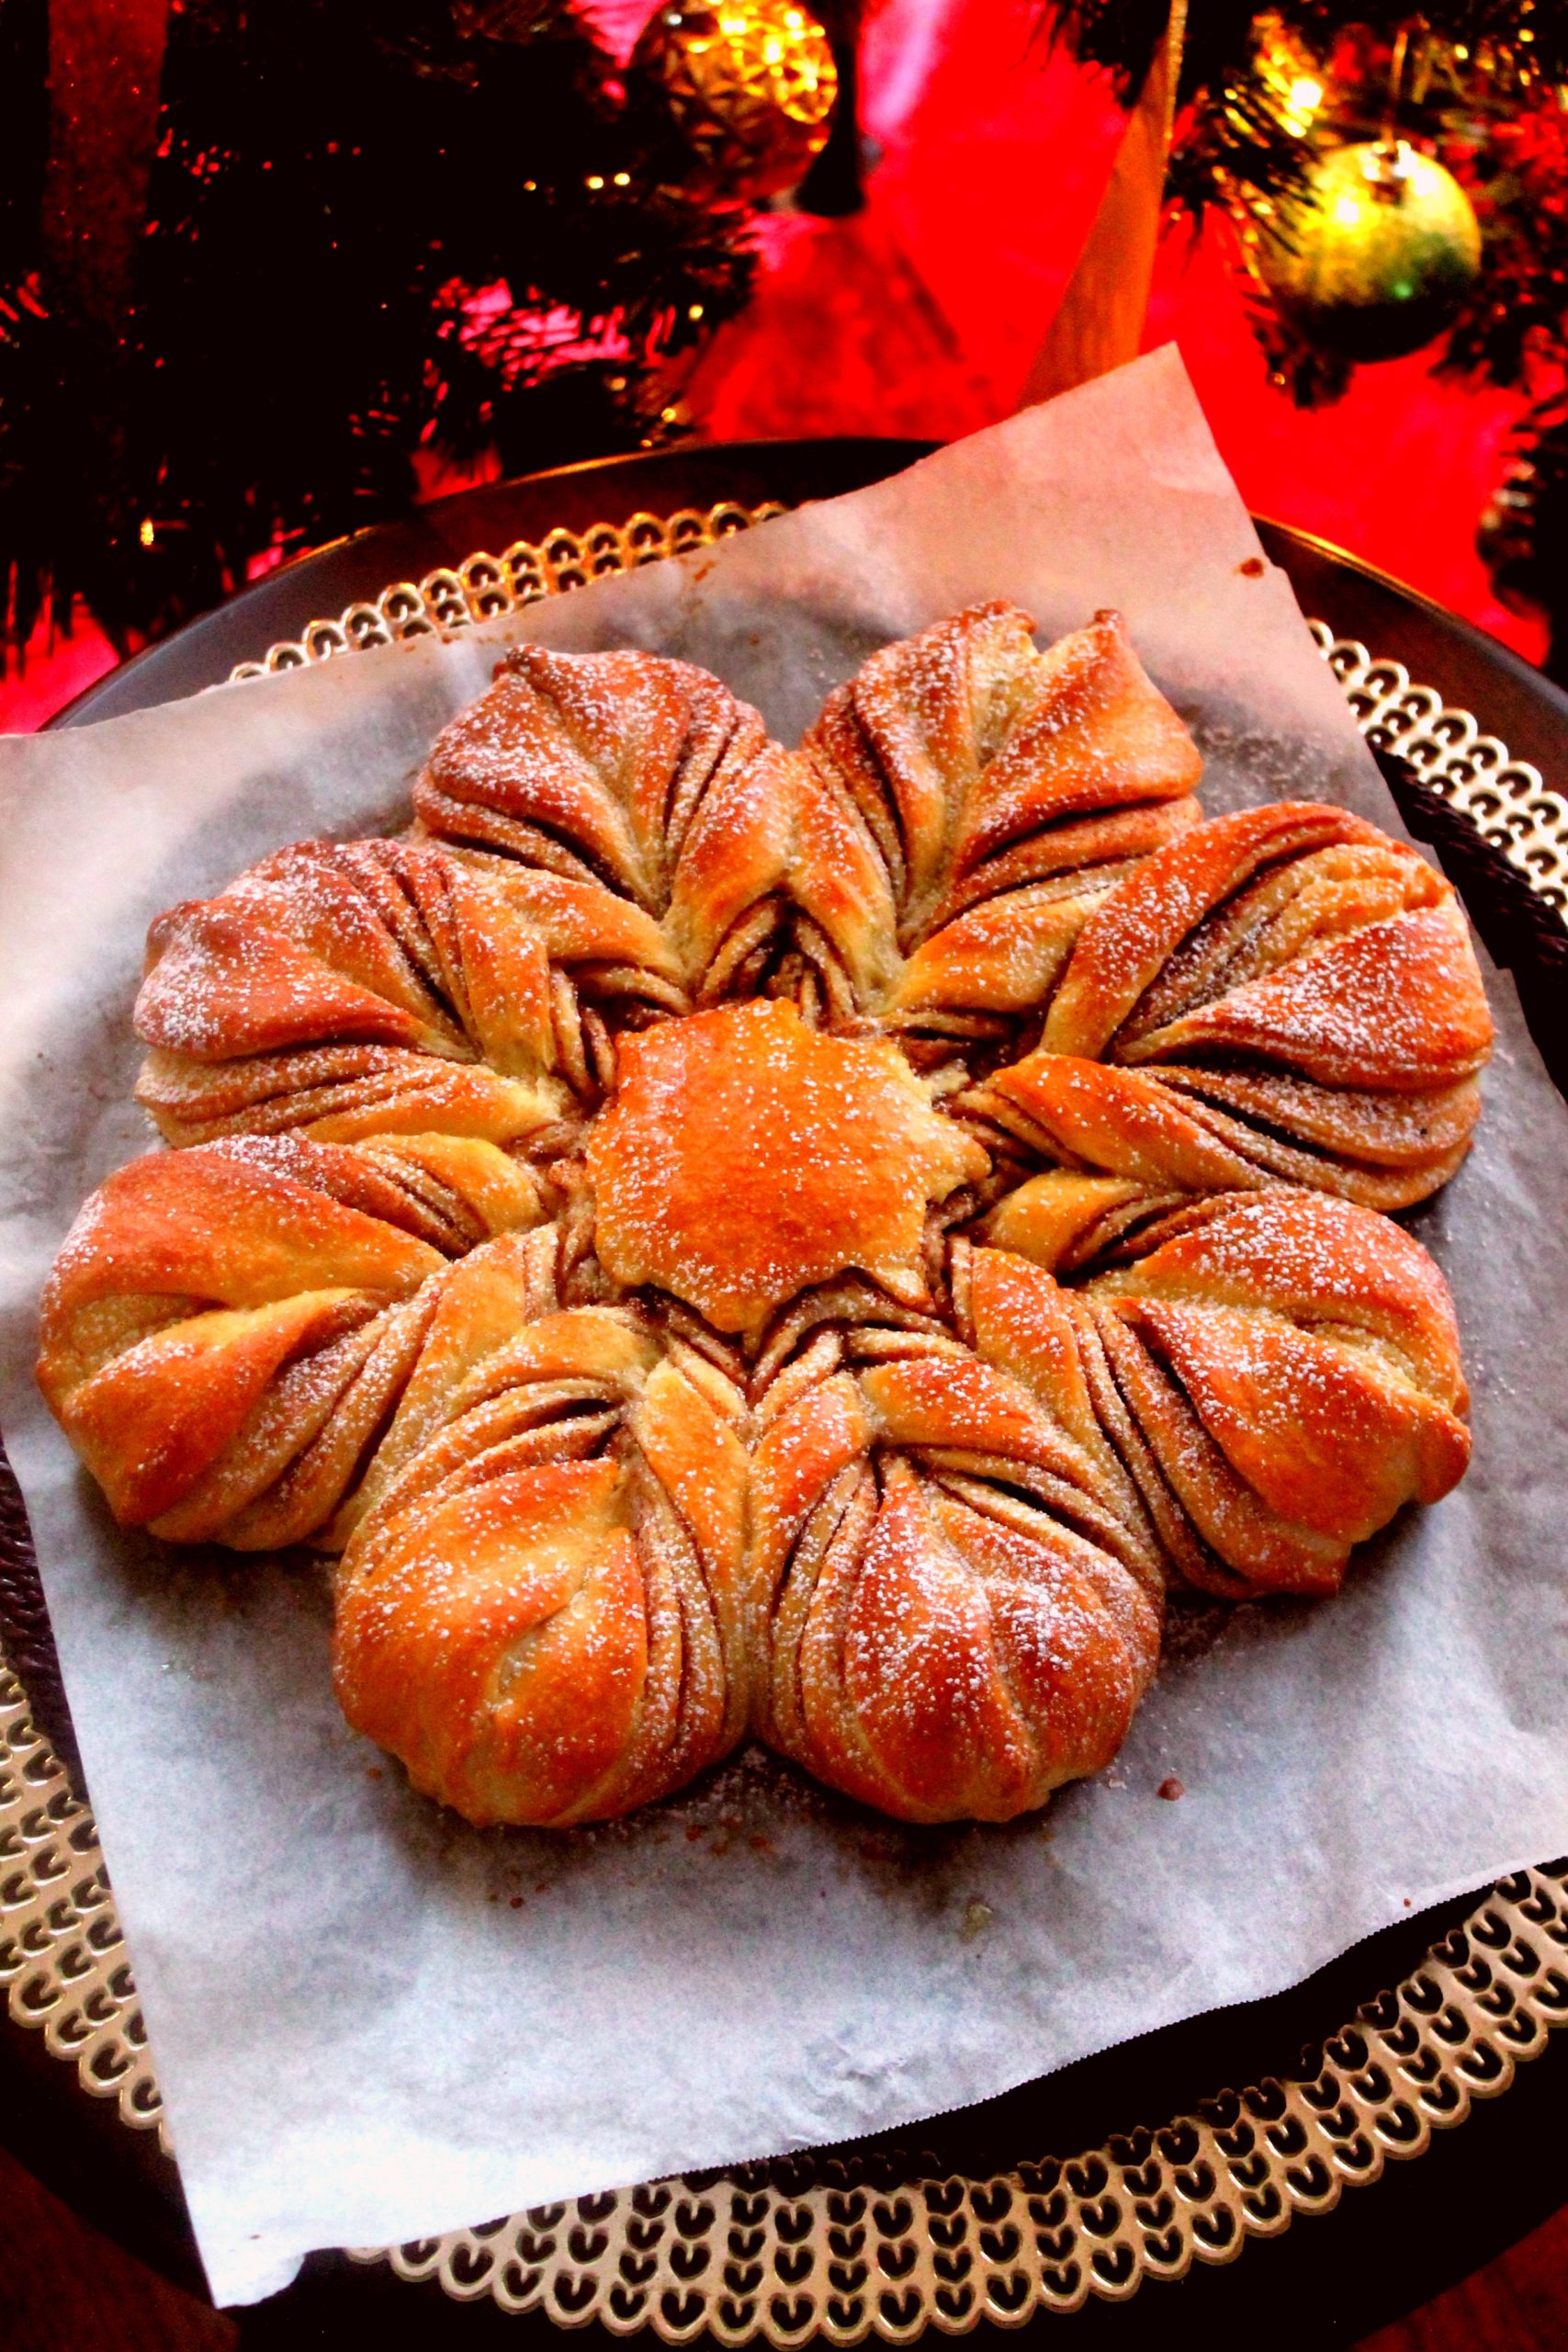
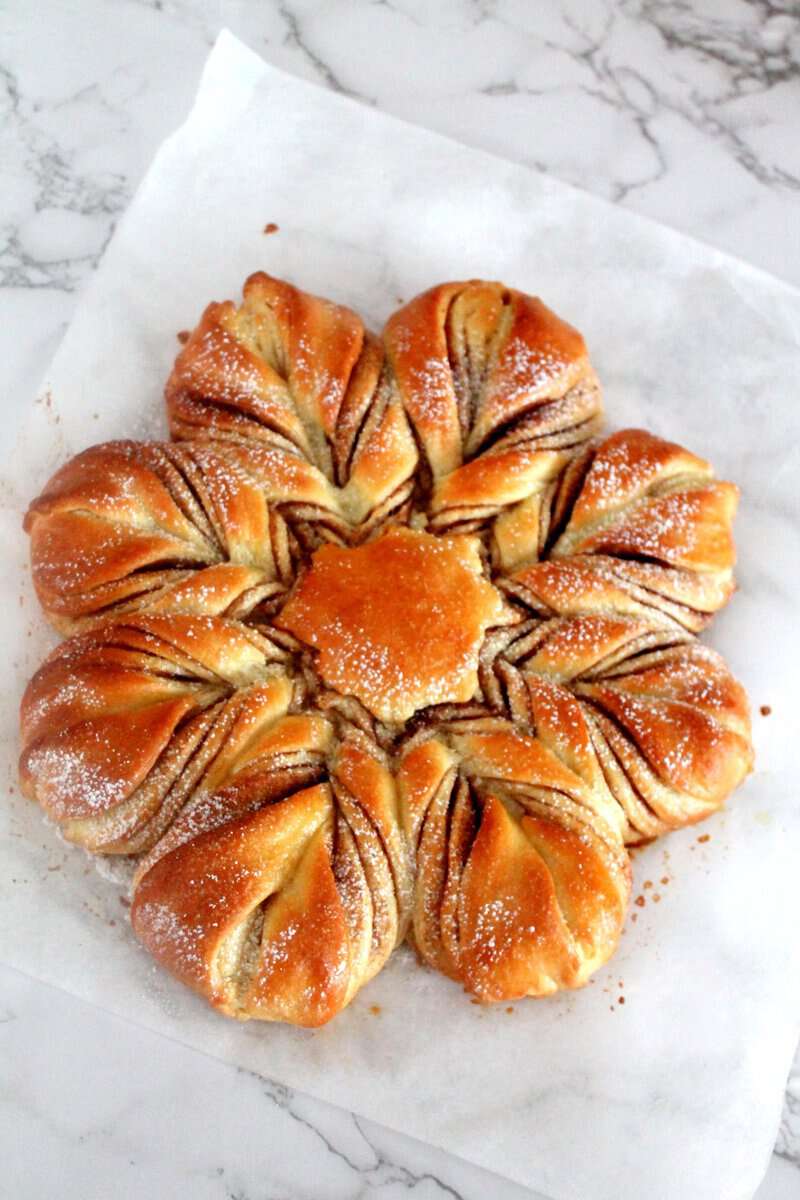
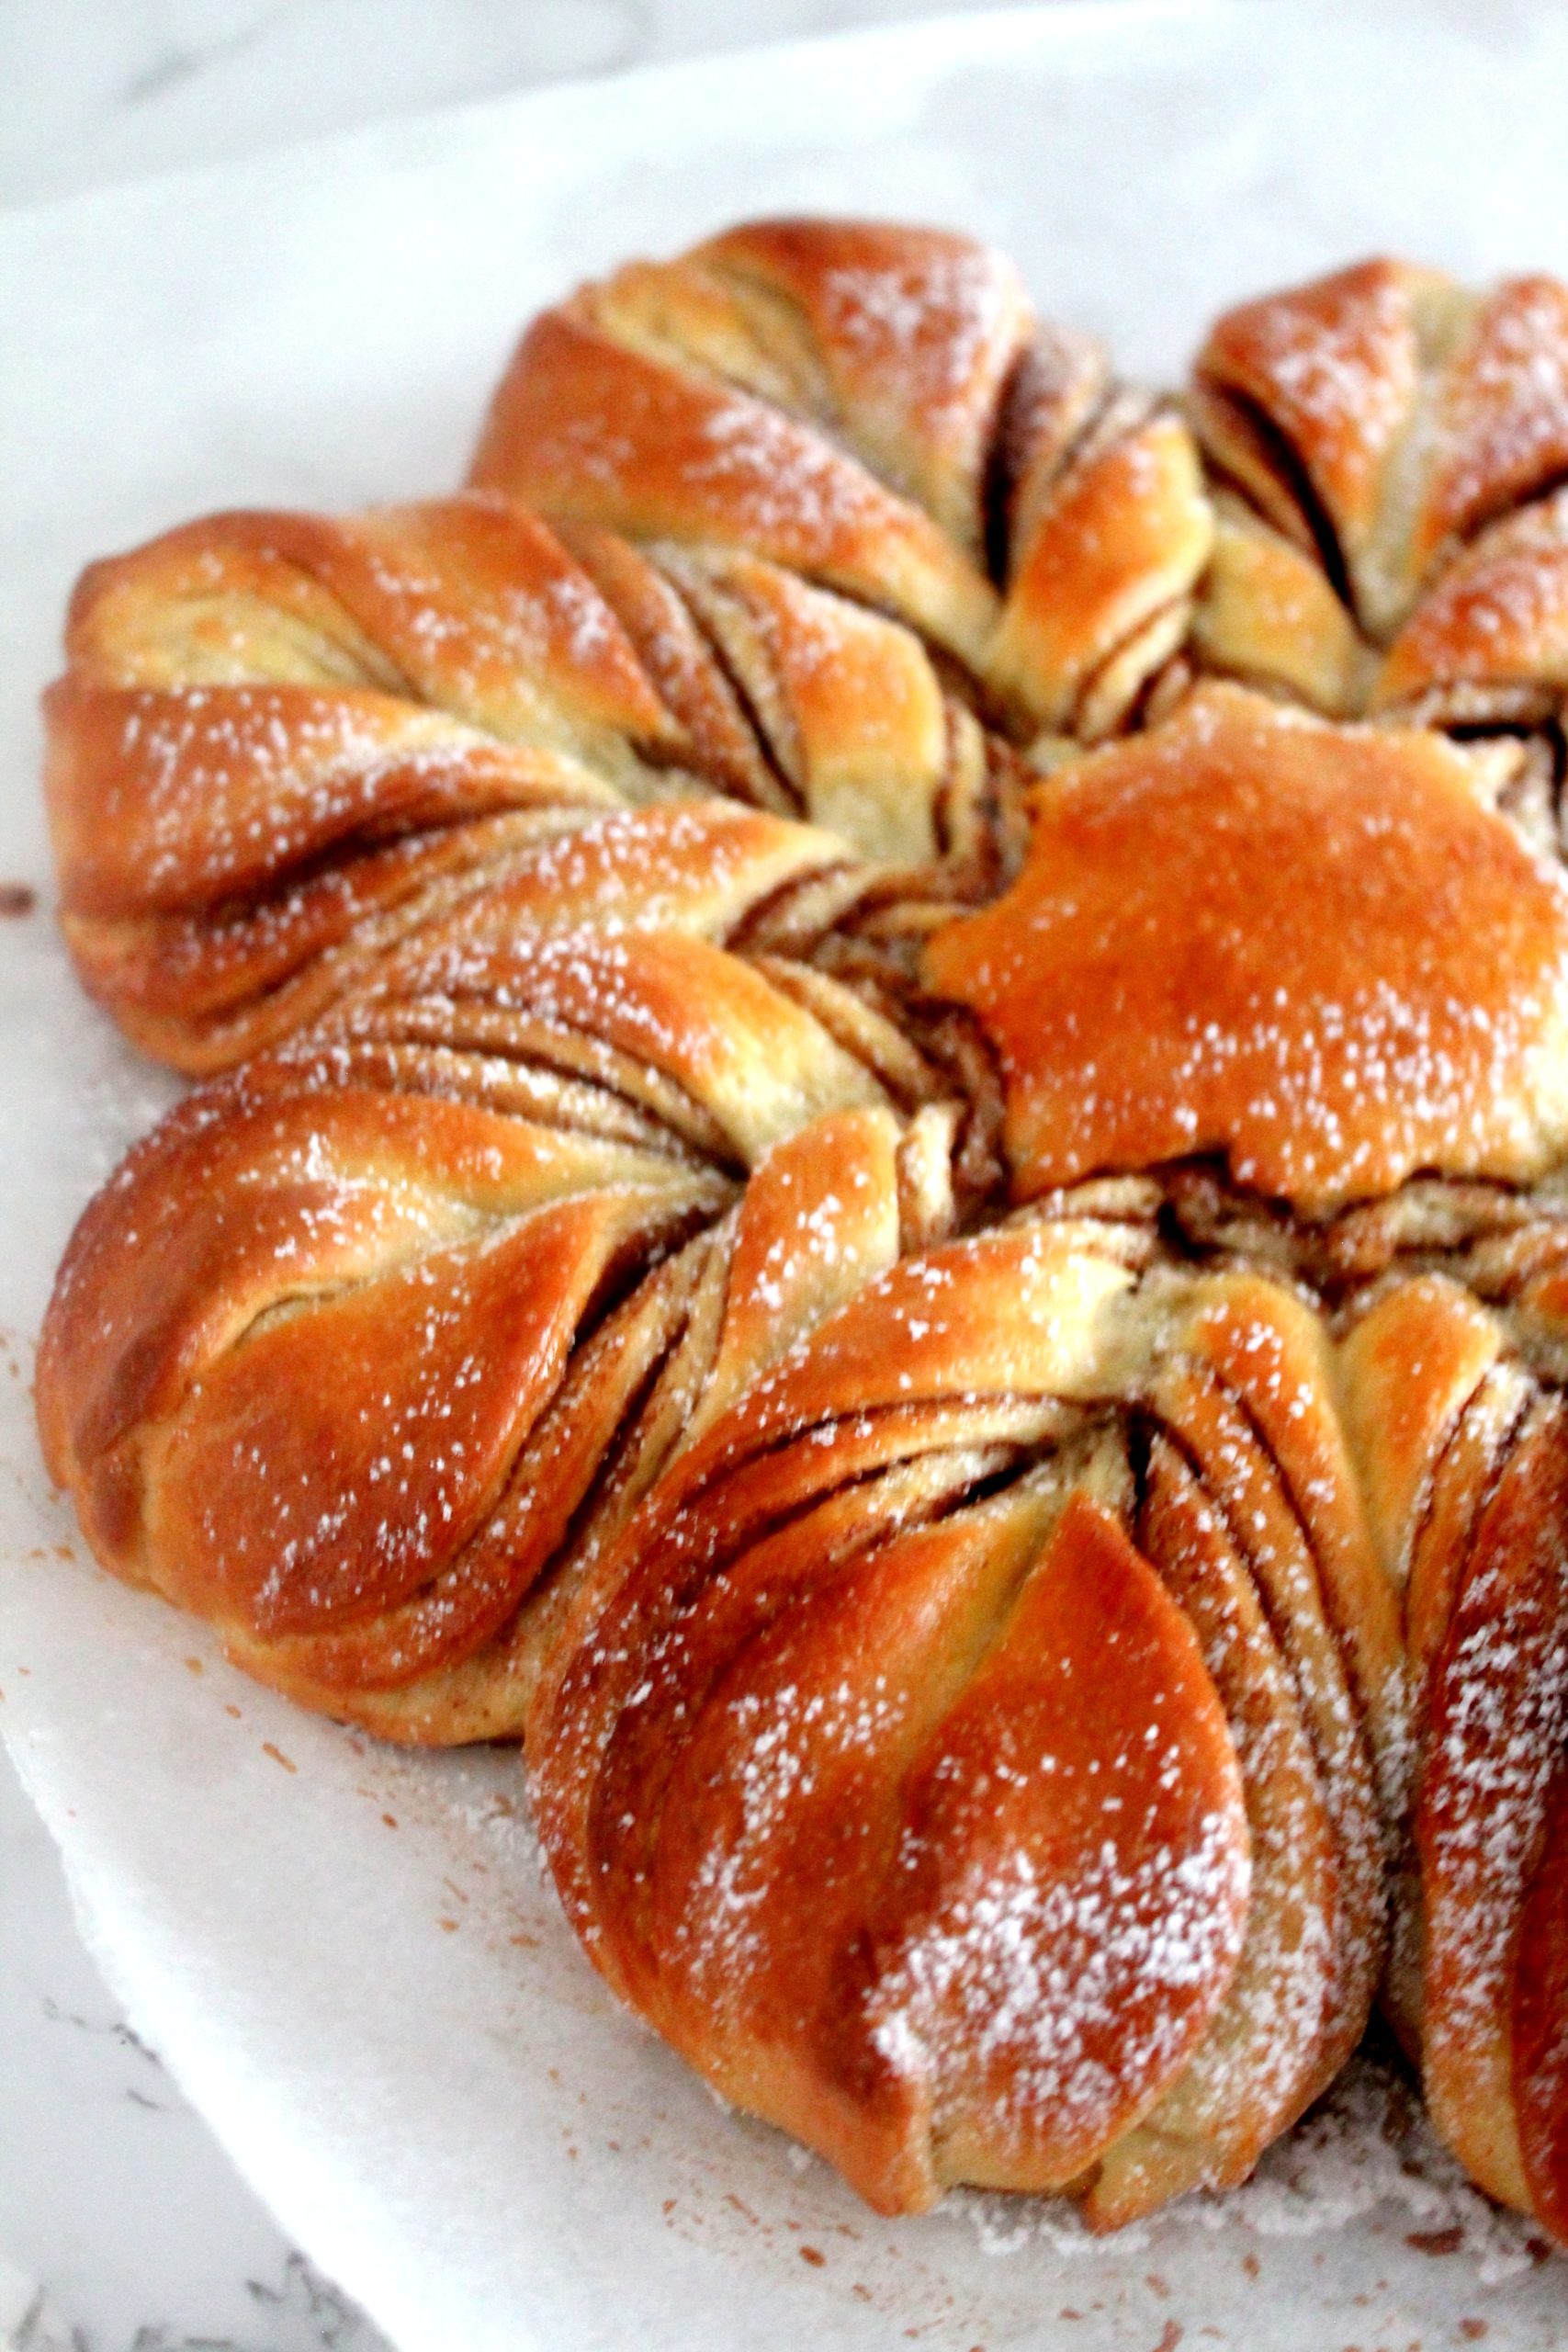
One of the finest creations, beautiful looking star-shaped bread made especially around the holidays. This soft, pull-apart bread is sweet and sticky, bursting with all the cinnamon flavors - it's incredible!!
Jump to:
- What is Star Bread
- Why You'll Love This Star Bread
- Ingredients
- Step-by-Step Star Bread Recipe
- Make-Ahead & Storage Tips
- Pro Tips
- Pro Tips For The Dough
- 16 Flavor Variations for Star Bread
- How to Measure Flour the Right Way?
- Common Questions about the dough
- Frequently Asked Questions
- More Bread Recipes
- How to make Star Bread
What is Star Bread
Star Bread, also known as Christmas Star Bread or Snowflake Bread, is a soft enriched dough shaped into layers and twisted into a gorgeous star pattern. It's tender, lightly sweet, and designed to pull apart layer by layer. The design looks professional but uses a basic shaping method that bakers of all levels can master.
Why You'll Love This Star Bread
- Showstopping holiday centerpiece: Its star shape looks beautifully intricate, making it perfect for Christmas gatherings and festive tables.
- Beginner-friendly: Despite its elegant appearance, the twisting and shaping process is easy and fun.
- Customizable filling: From warm cinnamon sugar to decadent Nutella, strawberry jam, or pesto for a savory twist.
- Soft, pull-apart texture: Every layer is tender, fluffy, and perfect for sharing.
- Family-friendly baking: Kids love helping with the layers and twists.
- Make-ahead friendly: Shape it the night before and bake fresh in the morning for stress-free holiday mornings.
- Perfect for gifting: Its design makes it feel special and handmade — a thoughtful, delicious present.
Ingredients
For the Dough:
- All-Purpose Flour: Gives the dough structure while keeping it soft and easy to shape.
- Lukewarm Milk: Activates the yeast and adds richness for a tender texture.
- Active Dry Yeast: Helps the dough rise and creates a light, fluffy crumb.
- Sugar: Lightly sweetens the dough and feeds the yeast for better rising.
- Large Egg + Egg Yolk: Adds richness and softness. (Reserve the egg white for brushing.)
- Vanilla Bean Paste or Vanilla Extract: Adds a warm, subtle sweetness that enhances the flavor.
- Salt: Balances sweetness and strengthens the dough.
- Unsalted Butter: Enriches the dough and creates a soft, buttery texture.
- Oil: Keeps the dough smooth, soft, and easy to work with.
For the Filling:
- Unsalted Butter: Adds richness and helps the filling spread smoothly.
- Granulated Sugar: Sweetens the filling and caramelizes slightly when baked.
- Ground Cinnamon: Gives the filling warm, fragrant flavor and classic cinnamon-sugar taste.
For the Egg wash:
- Reserved Egg White: Gives the bread a glossy, golden finish when baked.
- Milk: Helps thin the egg white for easy brushing and adds a subtle shine.
For the Dusting (topping):
- Unsalted Butter: Adds a rich, shiny finish and enhances flavor after baking.
- Confectioners’ Sugar: Gives a sweet, snowy touch and makes the bread look festive.
Step-by-Step Star Bread Recipe
In just 5 easy steps make a show-stopper, star bread at home!!
- Prepare the dough [By hand or using a Stand Mixer]
- First proofing [Traditional or using Instant Pot]
- Divide and shape the bread
- Second proofing
- Bake the star bread
Step 1: Prepare the dough
In a cup, stir in ⅔ cup of warm milk [100*F – 110* F], sugar, and yeast. Let the mixture stand for 10 minutes, or until it turns frothy, and doubles in volume.
Note: If the yeast is active, the mixture turns frothy, and doubles in volume. If the mixture does not double in size, start the process again with fresh yeast.
In a bowl, add flour, salt, yeast mixture, and eggs, using a spatula mix until the flour is incorporated.
Transfer the dough to a lightly floured work surface. Add softened butter, and knead the dough until it is soft, elastic, springs back when pressed, and is not sticky around 15-20 minutes. If using a stand mixer, knead the dough for 5 minutes.
Note: If the dough feels too sticky, add some flour and if it is too dry, add 1-2 teaspoons of warm milk, and knead the dough, until it is nice and soft.
Shape the dough into a ball and place it in a greased bowl.
Step 2: First proofing
Place the dough in a greased bowl and turn it once to grease the top.
Cover the bowl with a kitchen towel, and place it in a warm place, for 60-90 minutes or until it doubles in volume.
If using Instant Pot for proofing, place the dough in the greased inner pot, and turn it once to grease the top. Place the lid, and cover the pot. Turn ON YOGURT (normal) for 1 hour.
Note: I used a glass lid that fits, to cover the inner pot.
Step 3: Divide the dough
Transfer the dough onto a work surface, and punch it down. Divide the dough into 4 equal pieces. Shape each piece into a smooth ball. Cover the dough balls with a clean kitchen towel, and let them rest for 10 minutes.
Step 4: Shape the bread
Line a 9*12 inch baking sheet with some parchment paper.
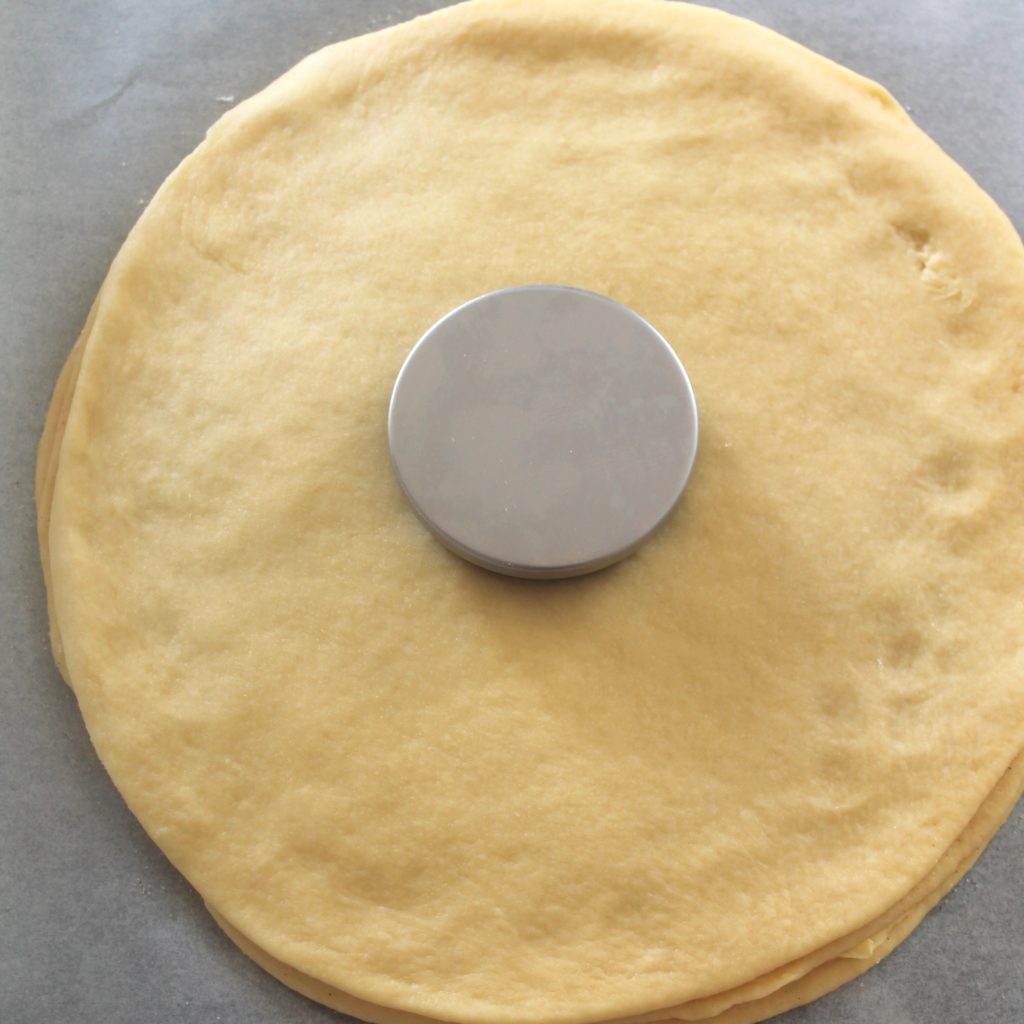
Lightly flour the work surface, and roll the ball into a 10-inch circle. Place the rolled circle onto a baking sheet.
Apply some softened butter, sprinkle ⅓ of the cinnamon-sugar mixture evenly on the top, leaving about ¼ inch of the edge of the circle bare.
Repeat the process with the remaining dough balls. There will be 4 layers of dough (circles) and 3 layers of filling, leaving the top layer of dough (circle) bare.
Note: The top layer of dough has no butter or cinnamon sugar on it.
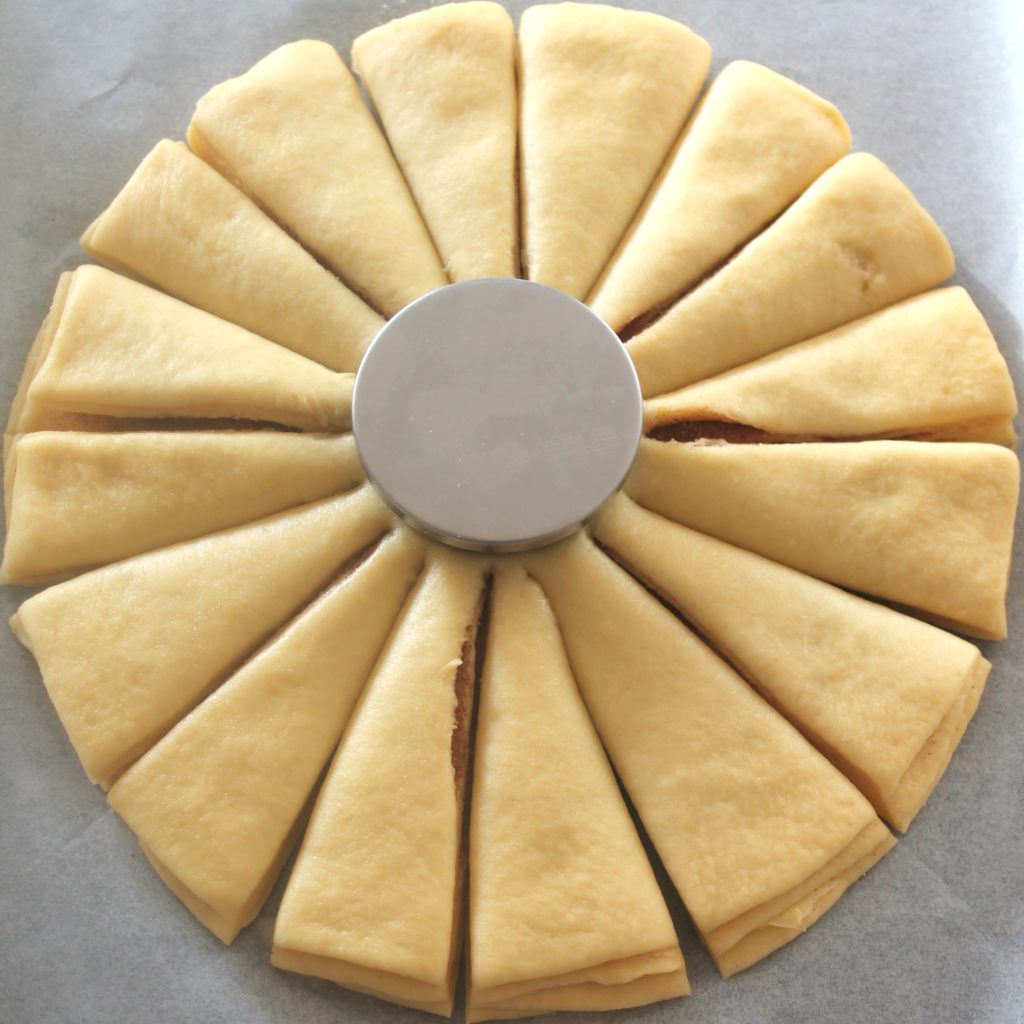
Place around 2 ½ inch round cookie cutter or a cup in the center of a rolled dough to mark the center of the star. Using a sharp knife, cut the circle into 16 equal strips, starting from the edge of the cutter to the end of the circle. Cut through all the layers, leaving the center mark, as shown below:
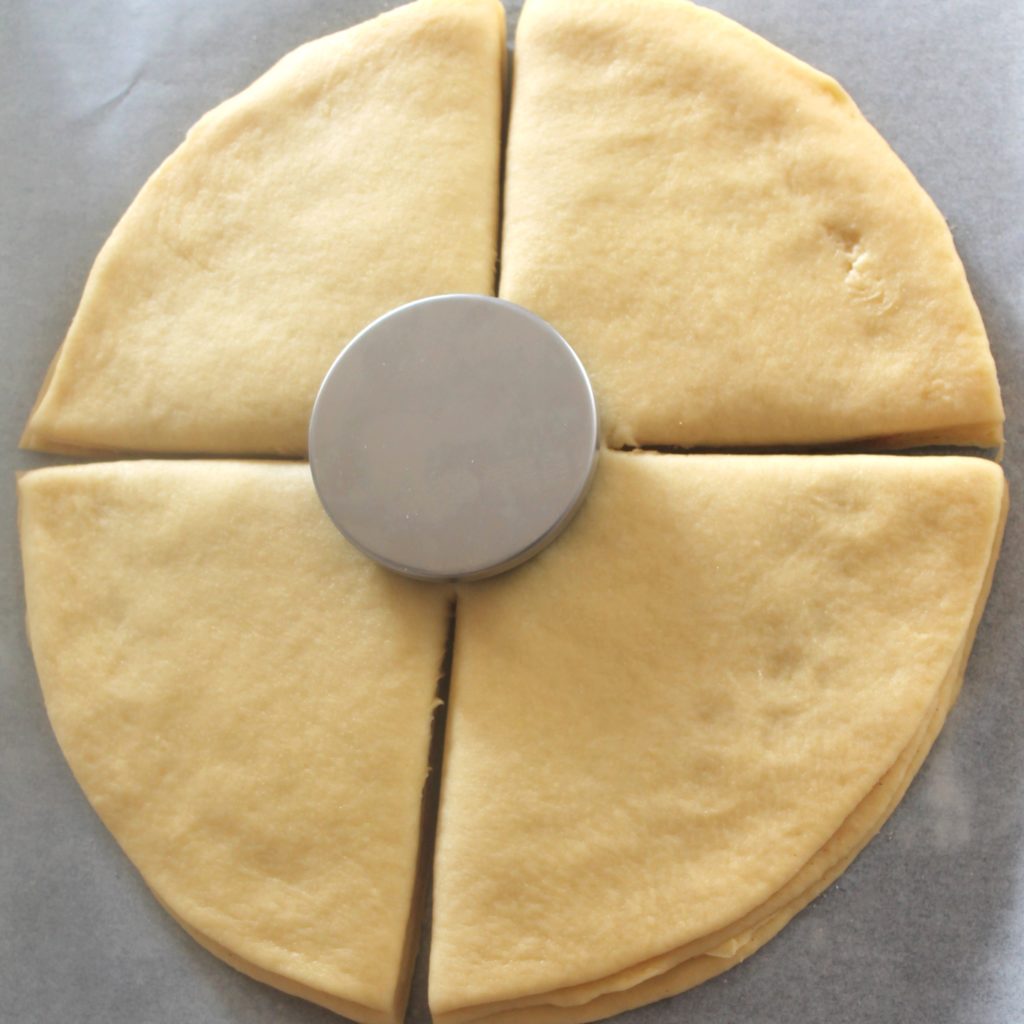
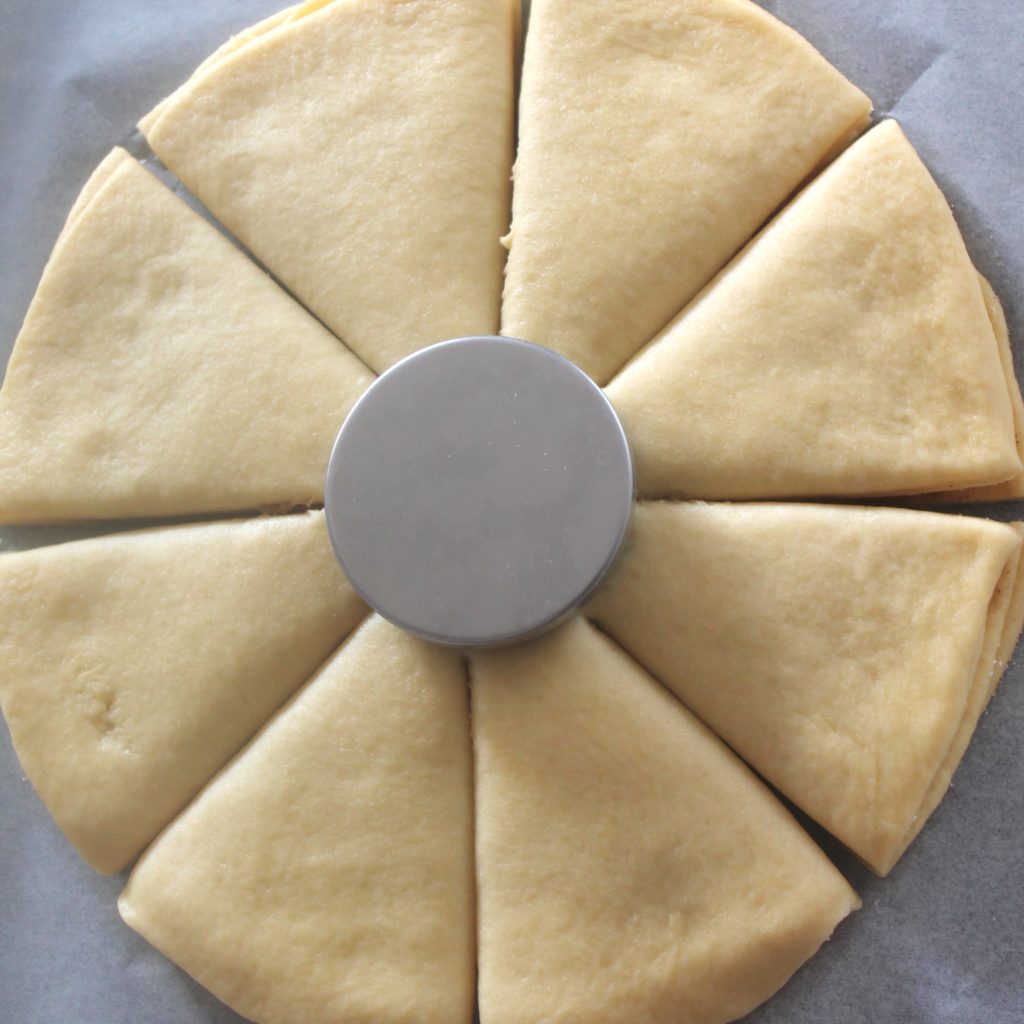
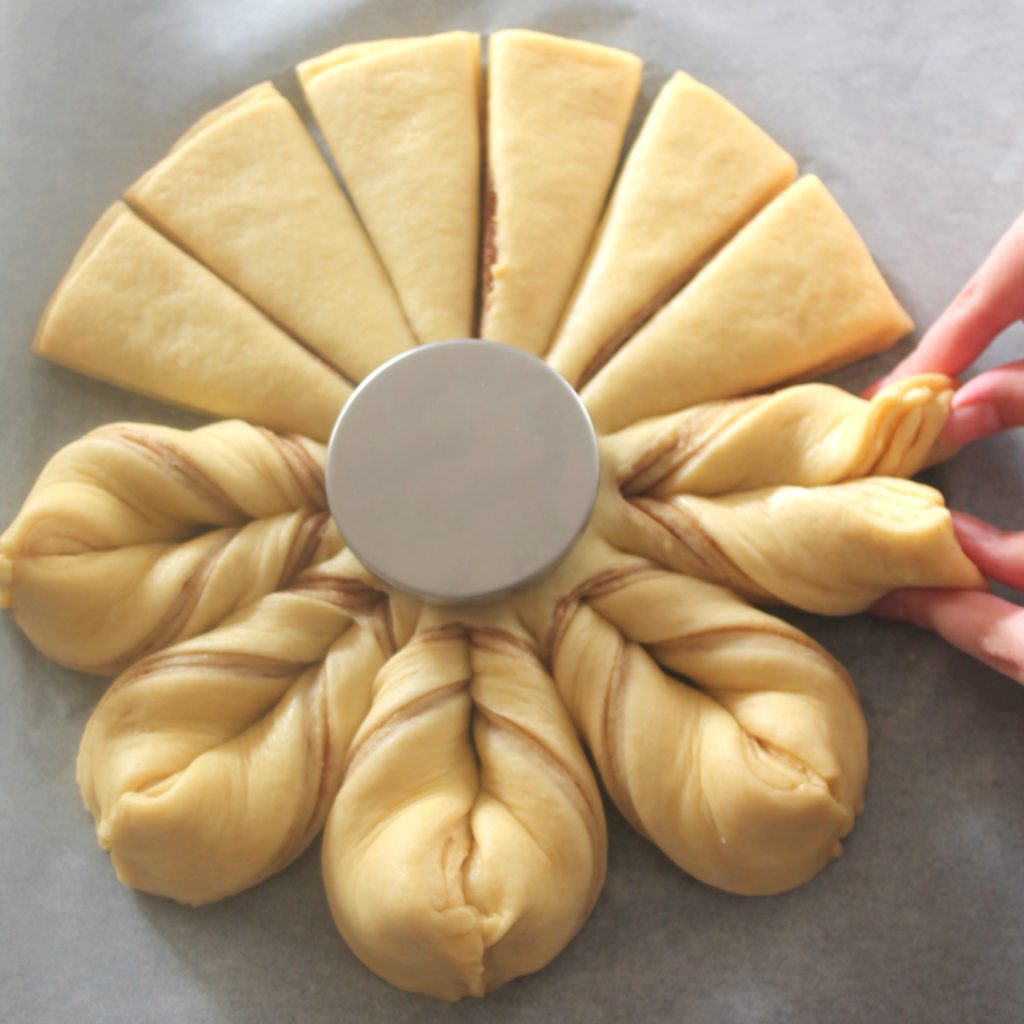
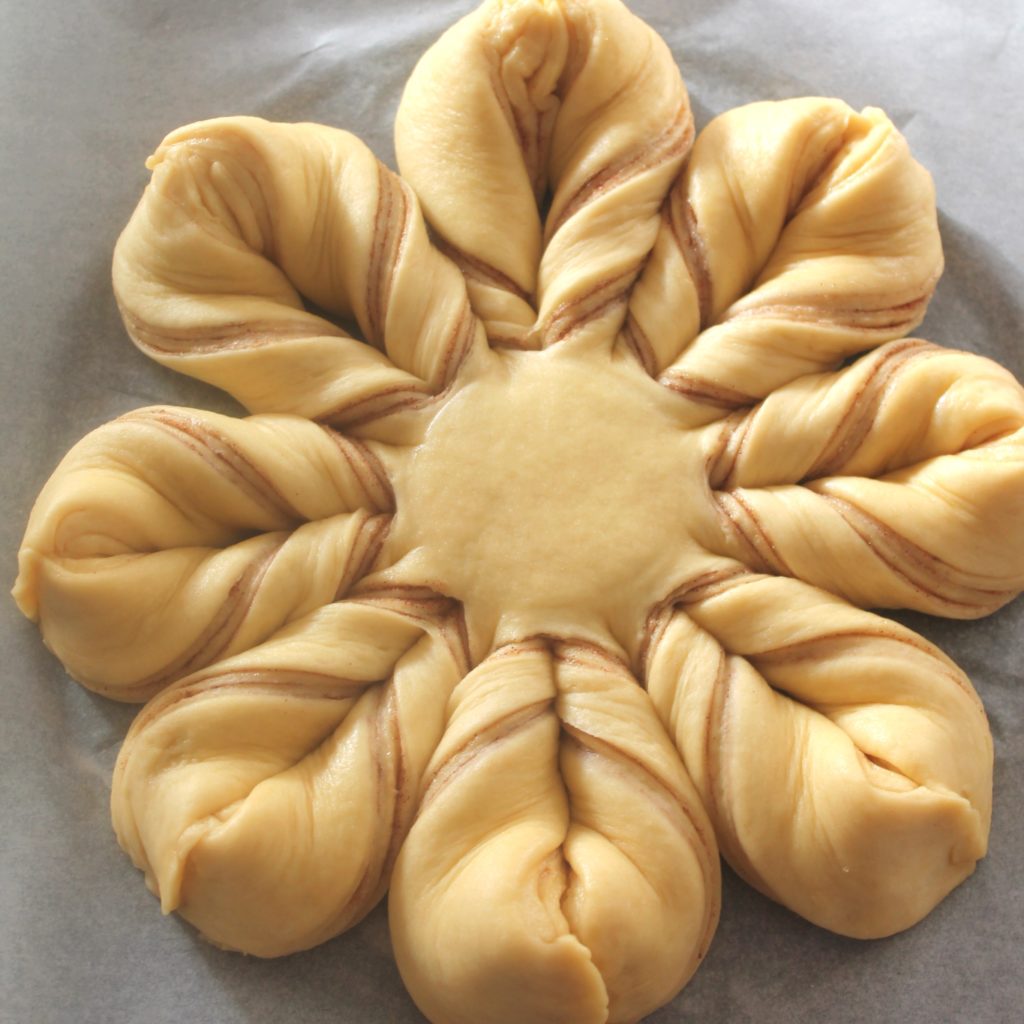
Using both hands, grab two adjacent strips and twist them twice, away from each other (outwards). Pinch the two ends of the strips together. Repeat the process with the remaining strips. Your star bread will have 8 pairs of strips.
Step 5: Second proofing
Cover the shaped bread with a plastic wrap, and place it in a warm place for 30-45 minutes or until it becomes puffy.
Note: Lightly spray the plastic wrap (the side that goes on the bread) with some cooking spray.
Step 6: Bake the Star Bread
Pre-heat the oven to 350*F.
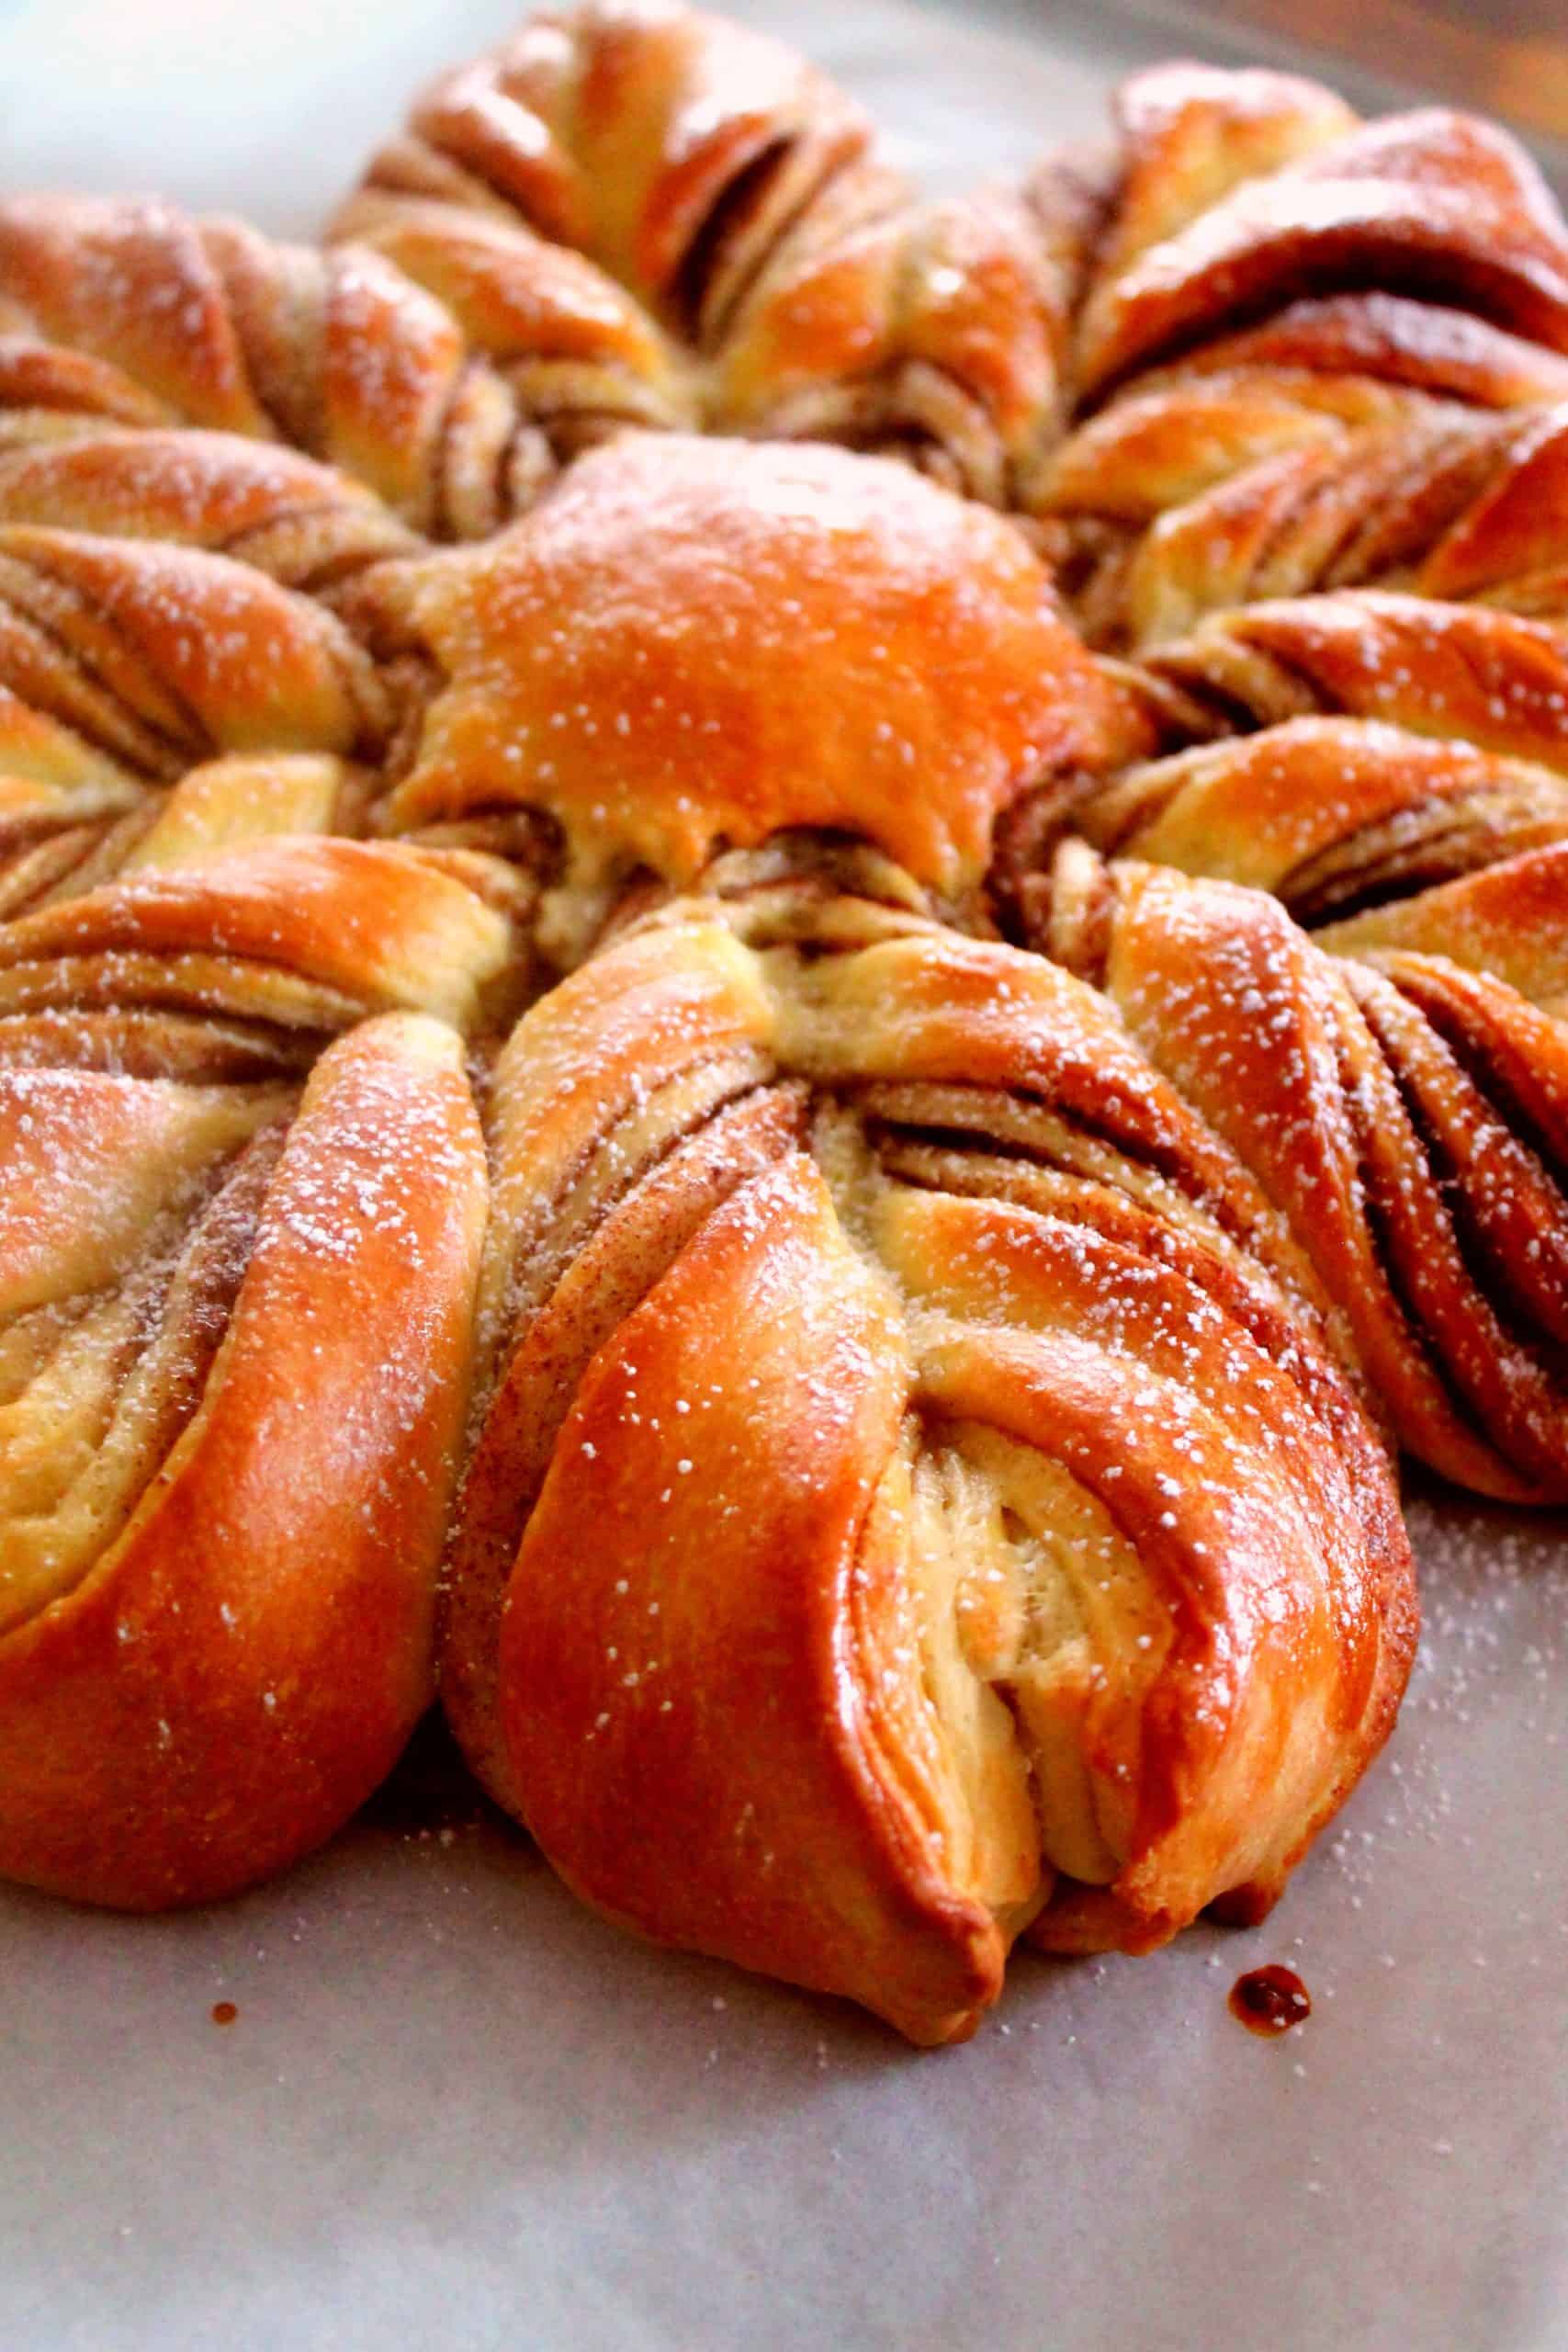
Using a pastry brush, lightly brush the bread with an egg wash. Bake the bread for 20-22 minutes or until the top is golden brown.
Note: If the top is browning quickly, loosely tent the bread with the foil.
Remove the bread from the oven, brush with some melted butter and allow it to cool for 10 minutes before serving.
Dust with some confectioner's sugar and enjoy Star bread!!
Pic Shown: Star Bread
Make-Ahead & Storage Tips
Make Ahead
Option 1: Prepare the dough and shape the star the night before. Cover and refrigerate overnight. In the morning, bring it to room temperature and bake fresh for the softest texture.
Option 2: Follow Step 1 & Step 2 of the recipe as discussed. After the dough has risen, punch it down to remove air bubbles, shape it into a ball, and place it in an air-tight container. The dough can be refrigerated for up to 2 days.
Option 3: To freeze the dough - Place the dough ball in a freezer-safe container or Ziploc bag and freeze it. You can freeze the dough for up to 3 months. To use it, thaw overnight in the refrigerator, and then let it sit on the kitchen counter for around 30 minutes. Punch it down, the dough is now ready to be used. Continue with Step 3.
Storing
Star Bread stays soft for 2–3 days at room temperature when wrapped tightly. A quick warm-up in the oven brings back its pillowy texture.
Freezing
Freeze baked Star Bread for up to 1 month. Thaw overnight in the fridge, then reheat lightly before serving.
To reheat star bread, preheat the oven to 350*F. Place the bread on a baking sheet, and tent it loosely with some foil. Bake for 5-6 minutes or until warm through.
Pro Tips
Use room-temperature dough: Cold dough can tear when layering and twisting. Soft, slightly warm dough shapes beautifully.
Chill the filling: If using Nutella or jam, chilling helps keep the layers clean and prevents leaking while twisting.
Roll evenly: Try to keep each dough circle the same size for a symmetrical star. Trim edges if needed.
Don't overfill: Too much filling causes slipping or tearing. A thin, even layer is best.
Light twists are key: Twist the segments gently, over-twisting can break layers or distort the shape.
Use parchment paper: Build and bake on the same sheet for easier shaping and transfer.
Brush before baking: A simple egg wash gives a golden, glossy finish that enhances the star shape.
Dust after cooling: Powdered sugar looks best when sprinkled on a cooled loaf (it melts on hot bread).
Pro Tips For The Dough
For measuring the flour, do not scoop the flour, instead, lightly fill the measuring cup with the flour, and level it with the back of the spoon. See – How to measure flour right way?
If the yeast is active, the mixture turns frothy and doubles in volume. If the mixture does not double in size, start the process again with fresh yeast.
Check the consistency of the dough after kneading it for 4-5 minutes. If it feels too sticky, add some flour and if it is too dry, add 1-2 teaspoons of warm milk, and knead the dough, until it is nice and soft.
Do not over-knead the dough. As soon as the dough is soft, elastic, springs back when pressed, and is not sticky. You know the dough is kneaded well.
If using a stand mixer to prepare the dough, occasionally scrape the sides of the bowl.
If using the oven to proof the dough, turn on the oven light. Do not turn on the oven.
Proof the dough until it becomes double in volume, do not overproof it.
Whatever filling you choose sweet or savory, make sure it does not have too much moisture and is not too runny. If the filling is too moist or runny, it will ooze out and make it messy.
16 Flavor Variations for Star Bread
Sharing 16 different filling ideas from sweet to savory you can use to make this beautiful, delightful Christmas star bread at home. Feel free to add the filling of your choice.
The important thing to note here is that, whatever filling you choose sweet or savory, make sure it does not have too much moisture and is not too runny. If the filling is too moist or runny, it will ooze out and make it messy.
Secondly, do not overstuff the filling, a thin layer of filling is all you need to add some flavor to this bread. Overly stuffed or filling that has large chunks will be difficult to shape and as a result, you will not be able to achieve star-shaped bread.
Cinnamon Sugar
By far one of the most devoured flavors - Cinnamon-sugar. Easy, yet delightful filling brings out the holiday cheer. I have used this delicious cinnamon-sugar filling in this recipe.
Apply some softened butter to the circle, sprinkle ⅓ of the cinnamon-sugar mixture evenly on the layer. Repeat this for the remaining 2 layers, leaving the top layer of dough bare.
Cinnamon Sugar + Orange + Cranberries
Love this combination of cranberries, orange, and cinnamon. We are so in the holiday mood 🙂 Mix 4 tablespoons of granulated sugar, 1 tablespoon of ground cinnamon, 2 teaspoons of orange zest, and 3 tablespoons of dried cranberries. Apply some softened butter to the circle, sprinkle ⅓ of the mixture, evenly on each layer of dough.
Pumpkin Spice
Love pumpkin spice? Pumpkin spice, a blend of amazing spices, such as cinnamon, ginger, cloves, nutmeg, and all-spice, adds warmth to this recipe. You will need 4 tablespoons of granulated sugar, and 1 tablespoon of pumpkin spice, mix well. Brush some softened butter onto each layer of dough, sprinkle ⅓, evenly on each layer of dough.
Nutella
Absolute favorite! Tastes amazing on its own or as a bread filling. Spread around 1 tablespoon of Nutella on each layer of dough, leaving about ¼ inch of the edge of the circle bare. If you find it difficult to spread it, simply microwave Nutella for a few seconds to achieve a spreadable consistency.
I also like to spread some homemade strawberry jam on it. Yum!!
Garlic Butter
Simple and packed with garlic flavor. Love the addition of fresh garlic to this bread. Spread some softened butter on each layer, top with some fresh minced garlic and some parsley. Top it with some of your favorite cheese for a boost.
Herbed Butter
Fresh herbs add a ton of flavor to this bread. Love the combination of fresh herbs smeared on the bread! I love thyme and rosemary with some garlic butter, tastes amazing. Finish it off with some sea salt. You can use fresh or dried herbs of your choice such as thyme, rosemary, parsley, chives, etc.
Mix 4 tablespoons of softened butter with some fresh or dried herbs of your choice and spread this mixture evenly on the layers of dough. Sprinkle some flaky sea salt on each layer. Bon-Appetit!!!
Pesto
Love the combination of pesto and some Parmesan cheese, absolutely crowd-pleasing! I also like to add some walnuts for an extra crunch. You can use nuts of your choice, pine-nuts, walnuts, and pecan, add a nice flavor, and crunch to this bread.
Spread a thin layer of pesto on each layer of the circle, top with some Parmesan cheese and some nuts of your choice. Use thick pesto instead of thin, for more flavor.
Pizza Filling
Yet, another classic combination loved by all ages! Apply some softened butter to each layer of the dough. Followed by a thin layer of tomato sauce, top it with some sundried tomatoes, dried oregano, basil, chili flakes, and some mozzarella cheese.
Cheese and Herbs with Caramelized Onions
Ricotta cheese, with some fresh or dried herbs, makes a great filling. Love to top it off with some caramelized onions!
Creamy Cheese Filling
Love creamy, cheesy bread? This is all cheese filling. Pick your favorite cheeses, a combination of two or three, or even more cheese.
Favorite Butter
Use your favorite nut butter or any butter as the filling. Apple butter, pumpkin butter, peanut butter, and almond butter, are a great addition.
Jam or Preserve
Pick your favorite jam, apple cranberry chutney, pie filling, or preserve and use it in the recipe. Any combo you like on your sandwich can be used here as a filling.
Chocolate
This one is for chocolate lovers. Love everything chocolate. Dark chocolate is my favorite and I use it in many of my recipes. This is a great way to use chocolate, simply melt some chocolate chips or grated chocolate and use it in the recipe.
Chai Spice
Love Chai (Indian Tea)? I could have chai any time of the day 🙂 Inspired by my roots, here's a great addition of filling made with all my favorite spices, which I use to make chai. You will need ¼ teaspoon each of ground ginger, ground green cardamom, ground cloves, and ground cinnamon. Mix all the dry spices along with 4 tablespoons of sugar. Brush each layer with some softened butter, and sprinkle ⅓ mixture evenly on each layer of dough.
Mithai (Indian Sweets)
Love Indian sweets? I just had to share this one, being one of my family's favorite mithai - badam katli (almond fudge). You will need 3 tablespoons of almond flour, ½ teaspoon of ground green cardamom, and 4 tablespoons of sugar, mix everything. Brush each layer with some softened butter, and sprinkle ⅓ of the mixture evenly on each layer of dough.
Zaatar Spice
Love Mediterranean food? Try this Zaatar spice-filling savory Christmas star bread. Commonly used in Mediterranean cuisine, zaatar spice is a blend of dried herbs such as thyme, oregano, and marjoram, along with toasted sesame seeds, dried sumac, and salt. Brush each layer of dough with 1 teaspoon of olive oil, sprinkle 1 tablespoon of zaatar spice blend evenly on each layer of dough.
How to Measure Flour the Right Way?
It is important to measure the flour using the right method. To avoid over-measuring, do not scoop the flour straight from the container.
- First, loosen the flour by giving it a good stir with a spoon or a spatula.
- Next, spoon the flour into the measuring cup, and fill the cup slightly over the rim.
- Now, level the flour using the back of the spoon or a knife.
Common Questions about the dough
This sections covers questions regarding the bread dough. The consistency of the dough, how long to knead the dough, the dough is sticky or dense.
What is the consistency of the dough?
The consistency of the dough is soft, elastic, and non-sticky. When you poke the dough, it springs back and does not stick.
Check the consistency of the dough after kneading it for 4-5 minutes. If it feels too sticky, add some flour and if it is too dry, add 1-2 teaspoons of warm milk, and knead the dough, until it is nice and soft.
How long do you knead the dough?
Depending upon the method used for kneading, the time will vary. If you are using a stand mixer to knead the dough, it takes somewhere from 8-10 minutes to knead the dough. If kneading the dough by hand, it takes around 20-25 minutes for a soft, non-sticky dough.
How do you know if the dough is kneaded enough?
A well-kneaded dough will be soft, elastic, springs back when you poke your finger, and won’t be sticky. If the dough does not pass this simple test, it means it needs more kneading.
Here are a few ways you can tell that the dough is kneaded well:
- First, it forms into a nice smooth dough, the dough will start to leave the sides of the bowl (stand mixer).
- Secondly, poke a finger, and if the dough springs back, and is not sticky, the dough is kneaded well.
- Lastly, you can also do a windowpane test. Take a small piece of dough, and stretch it as thin as possible. If the dough does not tear, and you can see a thin layer of dough, it means the dough is kneaded well.
Why do you knead the dough?
It is important to knead the dough before rising, as kneading develops the gluten in the dough. Gluten is made of long strands of protein, which makes the dough stretchy. The stretchy dough can hold the bubbles created by the yeast, thus making the dough rise.
Why is my dough too sticky?
Too much liquid can cause a sticky dough. Also, if you used cold, or room temperature milk, it can result in leaking of glutens, causing the dough to be sticky.
Why is my dough too tight?
When using a stand mixer chances are that you overworked the dough. The change in the composition of gluten molecules results in a non-stretchy dough. Overworked dough often feels too tight, and tough and breaks when you try to pull, or roll.
Why is Star Bread dense and chewy?
For a nice, soft, and fluffy bread, it is important to knead the dough enough. When the dough is not kneaded enough, either using a stand mixer or by hand, the dough will lack strength. When you make bread using this dough, chances are it will turn out chewy and quite dense in texture.
As the yeast grows, it produces gas, and carbon dioxide. Depending upon how much gas is produced in the dough, the bread will turn out light and soft.
Frequently Asked Questions
Star Bread is a beautifully shaped pull-apart bread created by layering dough, adding filling, and twisting it into a star-like design. It's popular during the holidays, especially Christmas.
This usually happens when the dough is too cold, the yeast is expired, or the environment is too drafty. Allow extra time in a warm spot for the dough to rise properly.
Yes! Shape the dough and refrigerate overnight. Let it come to room temperature before baking the next morning.
Absolutely. Freeze the baked bread for up to a month. Thaw overnight and warm gently before serving.
Cinnamon sugar, Nutella, fruit jam, brown sugar–spice blends, or even savory spreads like pesto and garlic butter.
Not at all, savory versions like herb & cheese or pesto are delicious and perfect for appetizers.
More Bread Recipes

How to make Star Bread
Equipment
Ingredients
For the star bread dough:
- 2 ½ cups (310g) all purpose flour
- ⅔ cup (150ml) warm milk [100*F – 110* F]
- 2 teaspoon (6.2g) active dry yeast
- 2 tablespoon (25g) sugar
- 1 large egg plus 1 large egg yolk [reserve 1 large egg white for brushing]
- ½ teaspoon vanilla bean paste or 1 teaspoon pure vanilla extract
- ½ teaspoon salt
- 4 tablespoon (56.5g) unsalted butter, softened
- ½ tablespoon vegetable or canola oil, to grease the bowl
For the bread filling:
- 2 tablespoon (28.2g) unsalted butter, softened
- 4 tablespoon (50g) granulated sugar
- 1 tablespoon ground cinnamon
For the egg wash:
- 1 reserved egg white plus 1 tablespoon (15ml) milk
For the dusting (topping):
- 2 tablespoon (28.2g) unsalted butter, softened
- 1 tablespoon (8g) confectioner's sugar
Instructions
Step 1: Prepare the dough
- In a cup, stir in ⅔ cup of warm milk [100*F – 110* F], sugar, and yeast. Let the mixture stand for 10 minutes, or until it turns frothy, and doubles in volume.Note: If the yeast is active, the mixture turns frothy, and doubles in volume. If the mixture does not double in size, start the process again with fresh yeast.
- In a bowl, add flour, salt, yeast mixture, vanilla, and eggs, using a spatula mix until the flour is incorporated.
- Transfer the dough to a lightly floured work surface. Add softened butter, and knead the dough until it is soft, elastic, springs back when pressed, and is not sticky around 15-20 minutes. If using a stand mixer, knead the dough for 5 minutes.Note: If the dough feels too sticky, add some flour and if it is too dry, add 1-2 teaspoons of warm milk, and knead the dough, until it is nice and soft.
- Shape the dough into a ball and place it in a greased bowl.
Step 2: First proofing
- Place the dough in a greased bowl and turn it once to grease the top.
- Cover the bowl with a kitchen towel, and place it in a warm place, for 60-90 minutes or until it doubles in volume.
- If using Instant Pot for proofing, place the dough in the greased inner pot, and turn it once to grease the top. Place the lid, and cover the pot. Turn ON YOGURT (normal) for 1 hour.Note: I used a glass lid that fits, to cover the inner pot.
Step 3: Divide the dough
- Transfer the dough onto a work surface, and punch it down. Divide the dough into 4 equal pieces. Shape each piece into a smooth ball. Cover the dough balls with a clean kitchen towel, and let them rest for 10 minutes.
Step 4: Shape the bread
- Line a 9*12 inch baking sheet with some parchment paper.
- Lightly flour the work surface, and roll the ball into a 10-inch circle. Place the rolled circle onto a baking sheet.
- Apply some softened butter, sprinkle ⅓ of the cinnamon-sugar mixture evenly on the top, leaving about ¼ inch of the edge of the circle bare.
- Repeat the process with the remaining dough balls. There will be 4 layers of dough (circles) and 3 layers of filling, leaving the top layer of dough (circle) bare.Note: The top layer of dough has no butter or cinnamon sugar on it.
- Place around 2 ½ inch round cookie cutter or a cup in the center of a rolled dough to mark the center of the star. Using a sharp knife, cut the circle into 16 equal strips, starting from the edge of the cutter to the end of the circle. Cut through all the layers, leaving the center mark.
- Using both hands, grab two adjacent strips and twist them twice, away from each other (outwards). Pinch the two ends of the strips together. Repeat the process with the remaining strips. Your star bread will have 8 pairs of strips.
Step 5: Second proofing
- Cover the shaped bread with a plastic wrap, and place it in a warm place for 30-45 minutes or until it becomes puffy.Note: Lightly spray the plastic wrap (the side that goes on the bread) with some cooking spray.
Step 6: Bake the Star Bread
- Pre-heat the oven to 350*F.
- Using a pastry brush, lightly brush the bread with an egg wash. Bake the bread for 20-22 minutes or until the top is golden brown.
- Note: If the top is browning quickly, loosely tent the bread with the foil.
- Remove the bread from the oven, brush with some melted butter and allow it to cool for 10 minutes before serving.
- Dust with some confectioner’s sugar and enjoy Star bread!!
Video
Notes
Nutrition
Disclaimer
Nutrition values are my best estimates. If you rely on them for your diet, use your preferred nutrition calculator.
JD says
Trying out this recipe...when do I add the vanilla? It's not in the instructions or the video!
Jyoti Behrani says
Sorry about it. I add vanilla at the time of kneading the dough, along with the rest of the dough ingredients. I have updated the instructions in the recipe card. Thank you!
Cheryl says
This looks and sounds amazing. How did you get it such a perfect circle? Practice, or do you maybe use a pie pan to cut around at the end?
Jyoti Behrani says
I guess practice, my friend 🙂 You can use pie pan around 10 inch for a perfect circle!
Karen says
I made this today and it is amazing! The recipe was step by step and fool proof! By far the best written recipe I have ever followed! I can’t wait to try other variations of this recipe, like the pizza one! Can’t wait to try other recipes by Jyoti!
Jyoti Behrani says
Hi Karen,
I am so glad you liked my recipe 🙂 Thanks for trying my recipe and for sharing your feedback!
Ashley Jarrett says
So beautiful and delicious. Thank you for sharing!
Jyoti Behrani says
Thanks Ashley. Hope you give this recipe a try!
Alice L Shockley says
This is wonderful! Thanks for the recipe. I have a question or three I didn't see answered, though I did look. First, have you ever doubled this? I would like to make them as gifts and that would speed things up a lot. Second, how on earth do you get those ends so neat? Mine wanted to come apart. I even tried wetting my fingers slightly. Finally, i see you suggest refrigerating the dough in balls. Have you tried shaping it before refrigerating? It would be to nice to just pop it in the oven for breakfast Christmas morning.
Jyoti Behrani says
Hi Alice, Yes, you can double the recipe. However, proofing time remains the same. Divide the dough into two equal parts and use it in the recipe as suggested. 2) Pull and pinch the ends tightly, it will stay together. I have shared the recipe video also. 3) I would not recommend proofing the shaped dough overnight. The shaped dough will get overly proofed and loose its shape or may deflate after sometime. You can refrigerate the dough and use it next day. Hope this helps. Thanks!
Alice Shockley says
I've got my second double batch in the oven with the light on for the first proof and the other in the instant pot. Wanted to say that the dough seems even better with the double batch. Maybe my big 5-quart mixer is happier with more to work with.
I'm so excited to give these as gifts this year. The first one was both beautiful and yummy!
Jyoti Behrani says
Great! I am so glad you liked my recipe ? Happy Holidays!
Felicia says
First time trying anything like this, it turned out AWESOME!!! I really liked the step by step instructions and my family was so impressed and it tasted sooooo good, it was gone in a few hours!! Thank you!!!
Jyoti Behrani says
Awesome! I am so glad you liked my recipe 🙂 Thanks for sharing your feedback!
Shweta says
Simple and beautiful bread. Used instant yeast and butter-garlic filling. I did not get the dark color as your picture, but it turned out so good.
Jyoti Behrani says
Awesome! I am so glad you liked my recipe ? Thanks for sharing your feedback!
Sharada says
Mom made this and it looked beautiful and tasted delicious!
Jyoti Behrani says
Awesome! I am so glad you liked my recipe 🙂 Thanks for sharing your feedback!
Becky says
This is delicious and fun. I adding a whole yeast packet 7g vs 6.2 so it over-puffed and the ends opened up but it was still pretty and tasty. The layering is a great trick that I will use in the future for cinnamon rolls etc. The video is very helpful, thanks.
Jyoti Behrani says
Awesome! I am so glad you liked my recipe ? Thanks for sharing your feedback!
Helen says
Thank you for the recipe and all the hints and suggestions. I have been making bread for over forty years and must say that none have come out as impressive looking! And the best thing is that it tasted as good as it looks. Can’t wait to try other flavors.
Jyoti Behrani says
Hi Helen, I am so glad you liked my recipe 🙂 Thanks for trying my recipe and for sharing your feedback!
Reshma says
I made this today for a friend’s birthday and it turned out so good! Thank you so much for such a detailed and easy to follow recipe! ??
Jyoti Behrani says
Hi, I am so glad you liked my recipe ? Thanks for trying my recipe and for sharing your feedback!
Janet C says
This is a wonderful recipe. Directions, pictures and video all make it so easy to follow. I will be making this often and look forward to trying all the variations. Thank you for a fantastic recipe!
Jyoti Behrani says
Awesome! I am so glad you liked my recipe 🙂 Thanks for sharing your feedback!
Amanda says
This bread is perfect for the holidays! The presentation is beautiful, and I love how versatile it is.
Jyoti Behrani says
I'm so glad you liked my recipe 🙂
Mairead says
Such impressive bread. Thank you for a wonderful recipe, with so many tips and instructions. I love all the details.
Jyoti Behrani says
You're welcome! I'm so glad you found my post helpful.
HEATHER PERINE says
Such a pretty bread!! This is on my Christmas baking bucket list. Thanks for the step by step photos too, so helpful!
Jyoti Behrani says
Great! I am so glad you found my post helpful. Happy baking!
Eliza says
What an absolutely beautiful bread and a great recipe... perfect for the holidays. Your delectable Star Bread will definitely be on our Christmas table this year. Thanks for another winner!
Jyoti Behrani says
You're welcome! I am so glad you liked my recipe:)
Tawnie Kroll says
This recipe is a WINNER! It's always loved by all and it's just SO gorgeous too! Thank you!
Jyoti Behrani says
Awesome! I am so glad you liked my recipe 🙂
Barbara says
Hi Jyoti …… thank you for a most interesting bread recipe. Can you please share how thick you roll each layer of dough.
Thank you!
Jyoti Behrani says
Hi Barbara, I divide the dough into 4 equal pieces and roll each piece of dough into 10-inch circle. I would say the thickness of the rolled circle is about 1/8 ths of the inch. Hope this helps. Thanks!
Jill says
Absolutely stunning! Normally I would be intimidated and not try this myself, but your photos and video were so helpful. Thank you!
Jyoti Behrani says
I am so glad you liked my star bread recipe 🙂
Lucy says
This star bread is delicious and has such a light and fluffy texture. It's perfect for the holidays. I especially love it on its own warm fresh out of the oven.
Jyoti Behrani says
So glad you enjoyed my star bread recipe 🙂
Mandy Applegate says
Wow, this star bread is stunning!
Jyoti Behrani says
Thank you so much ?
Dana Sandonato says
This is 100% the most gorgeous bread recipe I've ever seen, let alone made! And it's so delicious! This recipe actually made me feel like I could bake, haha. I'm not much of a baker, but this was easy, approachable, and it turned out beautifully. Thank you!
Jyoti Behrani says
Awesome! I am so glad you liked my star bread recipe ?
Alisa Infanti says
So beautiful and perfect for a holiday table
Jyoti Behrani says
Glad you liked my recipe ?
Anna says
Hello Jyoti, hopefully you receive this (a year after your post!). If I am using pesto as my filling, do I use the sugar to activate the yeast but skip adding vanilla? Is that the conversion for savoury? I realise I won’t add sugar on top.
Thank you
Jyoti Behrani says
Hi Anna, For savory star bread, I would suggest use 2 teaspoons of sugar, just enough to activate the yeast and skip the vanilla. Hope this helps. Thanks!
Anna says
Thanks so much for your speedy reply, Jyoti. I’m making it right now and look forward to taking it to Christmas lunch. Enjoy your festive season ?
Vy says
I made this but swapped out the vanilla for pandan extract and then made a passionfruit jam (passionfruit came from my grandma's yard) to put in between the layers. It was a BIG hit with the elders, I think it's going to be a new xmas eve tradition for my family! thanks for this!
Jyoti Behrani says
Awesome!! I am so happy you liked my recipe 🙂 Happy Holidays!